Keycloak
Keycloak is an open-source Identity and Access Management (IAM) solution that offers single sign-on (SSO), user federation, identity brokering, and robust authentication features. It enables developers to secure applications and services with minimal coding effort, providing a centralized login service that supports authentication protocols such as OpenID Connect, OAuth 2.0, and SAML.
This guide demonstrates how to integrate a fraud detection system into the user registration flow in Keycloak, designed to block disposable email addresses and automated bot sign-ups. The system leverages TrustPath to identify and prevent potentially fraudulent registrations before they are completed.
The core concept is straightforward: whenever a user attempts to register, Keycloak sends relevant data to TrustPath. Based on the risk score returned, the system either permits or denies the registration.
To achieve this, we will utilize Keycloak's Service Provider Interface (SPI) to inject custom logic at specific points in the authentication and registration process.
What you need
Here's what you need to get started.
- Keycloak server - Set up a Keycloak server either locally or in the cloud. You can download Keycloak from the official site.
- Java Development Kit (JDK) - Version 11 or higher is required for Keycloak development.
- Maven - For building your Keycloak SPI module.
- TrustPath account - Sign up here if you don't have one. A free account does not require any payment information.
- TrustPath API access - Grab an API key from the TrustPath console.
- Git repo for storing your code - clone this repository. It contains integration code that is already prepared for use with this guide.
Step 1: Set up the SPI module
To ensure your SPI functions correctly in Keycloak, the module must follow a specific structure and setup process.
- Create a new Maven project, or clone our template repository to get started quickly.
- Configure your
pom.xmlfile with the necessary Keycloak dependencies. - Implement the relevant SPI interfaces provided by Keycloak.
If you're starting from scratch, cloning the template repository and updating any required dependencies is often the easiest and most efficient approach.
Step 2: Set Up TrustPathClient Java Client
The first step is setting up the TrustPathClient Java client to enable sending requests to TrustPath. We'll use Apache HttpClient to send requests to https://api.trustpath.io.
The code below loads two environment variables: the TrustPath API URL and API key. These variables are used in the evaluateRisk() method, which accepts several parameters that TrustPath uses to assess the risk of a registration attempt.
TrustPath requires an API key to authenticate your requests. To get your API Key:
- Log in to the TrustPath Console.
- On the left-hand menu, go to [Your Name] > API Keys.
- Copy either one of the API keys provided there.
public class TrustPathClient
{

   public static final String API_URL = System.getenv("TRUST_PATH_API_URL");
   public static final String API_KEY = System.getenv("TRUST_PATH_API_KEY");

   private final Logger log = LoggerFactory.getLogger(TrustPathClient.class);
   private static ObjectMapper objectMapper;

   static {
      objectMapper = new ObjectMapper();
      objectMapper.configure(DeserializationFeature.FAIL_ON_UNKNOWN_PROPERTIES, false);
   }

   /**
    * Evaluates the risk for a user registration and returns a decision.
    *
    * @param ip Client IP address
    * @param email User's email address
    * @param firstName User's first name
    * @param lastName User's last name
    * @return State enum value (APPROVE, REVIEW, or DECLINE)
    * @throws IOException If API communication fails
    */
   public State evaluateRisk(String ip, String email, String firstName, String lastName) throws IOException {
      CloseableHttpClient httpClient = HttpClients.createDefault();
      HttpPost httpPost = new HttpPost(API_URL);

      ObjectWriter ow = objectMapper.writer().withDefaultPrettyPrinter();
      String json = ow.writeValueAsString(new RiskRequest(ip, email, "account_register", firstName, lastName));

      log.info(json);
      StringEntity entity = new StringEntity(json, ContentType.APPLICATION_JSON);
      httpPost.addHeader("Authorization", "Bearer "+API_KEY);
      httpPost.setEntity(entity);

      CloseableHttpResponse response = httpClient.execute(httpPost);
      String responseJson = EntityUtils.toString(response.getEntity());
      RiskAssessment riskAssessment = objectMapper.readValue(responseJson, RiskAssessment.class);

      response.close();
      httpClient.close();

      return riskAssessment.data.score.state;
   }
}
Other supporting DTO classes are included in the repository but are omitted here for brevity.
Step 3: Define the SPI entry point
The SPI implementation begins with a class that extends Keycloak's authentication provider by implementing the FormActionFactory interface:
public class EmailValidationFactory implements FormActionFactory {
    @Override
    public FormAction create(KeycloakSession session) {
        return new EmailValidator();
    }
    // Other required interface methods...
}
The FormActionFactory interface is responsible for creating instances of FormAction.
Next, we need to register this factory with Keycloak by creating a file at:
META-INF/services/org.keycloak.authentication.FormActionFactory
In this file, specify the fully qualified name of your factory class:
trustpath.io.EmailValidationFactory
What the EmailValidator Does
The EmailValidator class implements Keycloak's FormAction interface and serves as a custom validation step during the user registration process. Its main responsibility is to evaluate the risk associated with a user's email using TrustPath, and either allow or block the registration based on that evaluation.
-
Validation Logic (
validate): When a user submits the registration form, this method is called:-
It extracts the email, first name, and last name from the submitted form data.
-
If the email is missing, it immediately stops the process and returns a validation error.
-
It attempts to retrieve the user's IP address, although the current TrustPath implementation doesn't use it.
-
It calls the
TrustPathClient.evaluateRisk()method to assess the email's risk level. -
Based on the returned
State(APPROVE, REVIEW, or DECLINE), it:- APPROVE: Proceeds with registration.
- REVIEW: Logs that the registration needs review but allows it to proceed.
- DECLINE: Blocks the registration and displays an error message indicating the email is risky.
-
If an error occurs while contacting TrustPath (e.g., network issue), it logs the error and blocks the registration, instructing the user to try again later.
-
In summary, EmailValidator acts as a real-time email risk filter, using TrustPath to help prevent suspicious or fraudulent registrations from completing.
Step 4: Compile and Run
Once all implementation and configuration files are in place, compile the project using Maven:
mvn clean install
This will generate a .jar file in the target directory, which you can then deploy to your Keycloak server's providers directory. Restart Keycloak for the changes to take effect. In this guide, we will be using Keycloak running in Docker to simplify setup and deployment. This allows for quick testing and iteration without installing Keycloak directly on your system.
docker run -p 8080:8080 \
  -e KC_BOOTSTRAP_ADMIN_USERNAME=admin \
  -e KC_BOOTSTRAP_ADMIN_PASSWORD=admin \
  -e TRUST_PATH_API_URL=https://api.trustpath.io/v1/risk/evaluate \
  -e TRUST_PATH_API_KEY=[YOUR_API_KEY] \
  -v /YOUR_JAR_PATH.jar:/opt/keycloak/providers/trustpath.io-integration-example.jar \
  quay.io/keycloak/keycloak:26.2.2 \
  start-dev
This docker run command starts a Keycloak server in development mode with custom settings and your SPI (Service Provider Interface) extension. Here's a breakdown:
-p 8080:8080: Maps port 8080 of the container to port 8080 on your host machine.-e KC_BOOTSTRAP_ADMIN_USERNAME=adminand-e KC_BOOTSTRAP_ADMIN_PASSWORD=admin: Sets the initial admin username and password.-e TRUST_PATH_API_URL=...and-e TRUST_PATH_API_KEY=...: Passes TrustPath API URL and API key as environment variables for your custom code.-v ...:/opt/keycloak/providers/trustpath.io-integration-example.jar: Mounts your compiled SPI JAR file into the Keycloak container so it can be loaded as a custom provider.quay.io/keycloak/keycloak:26.2.2: Specifies the Keycloak Docker image version.start-dev: Runs Keycloak in development mode, which enables features like hot reload and disables strict hostname checks.
Step 5: Configuring Keycloak
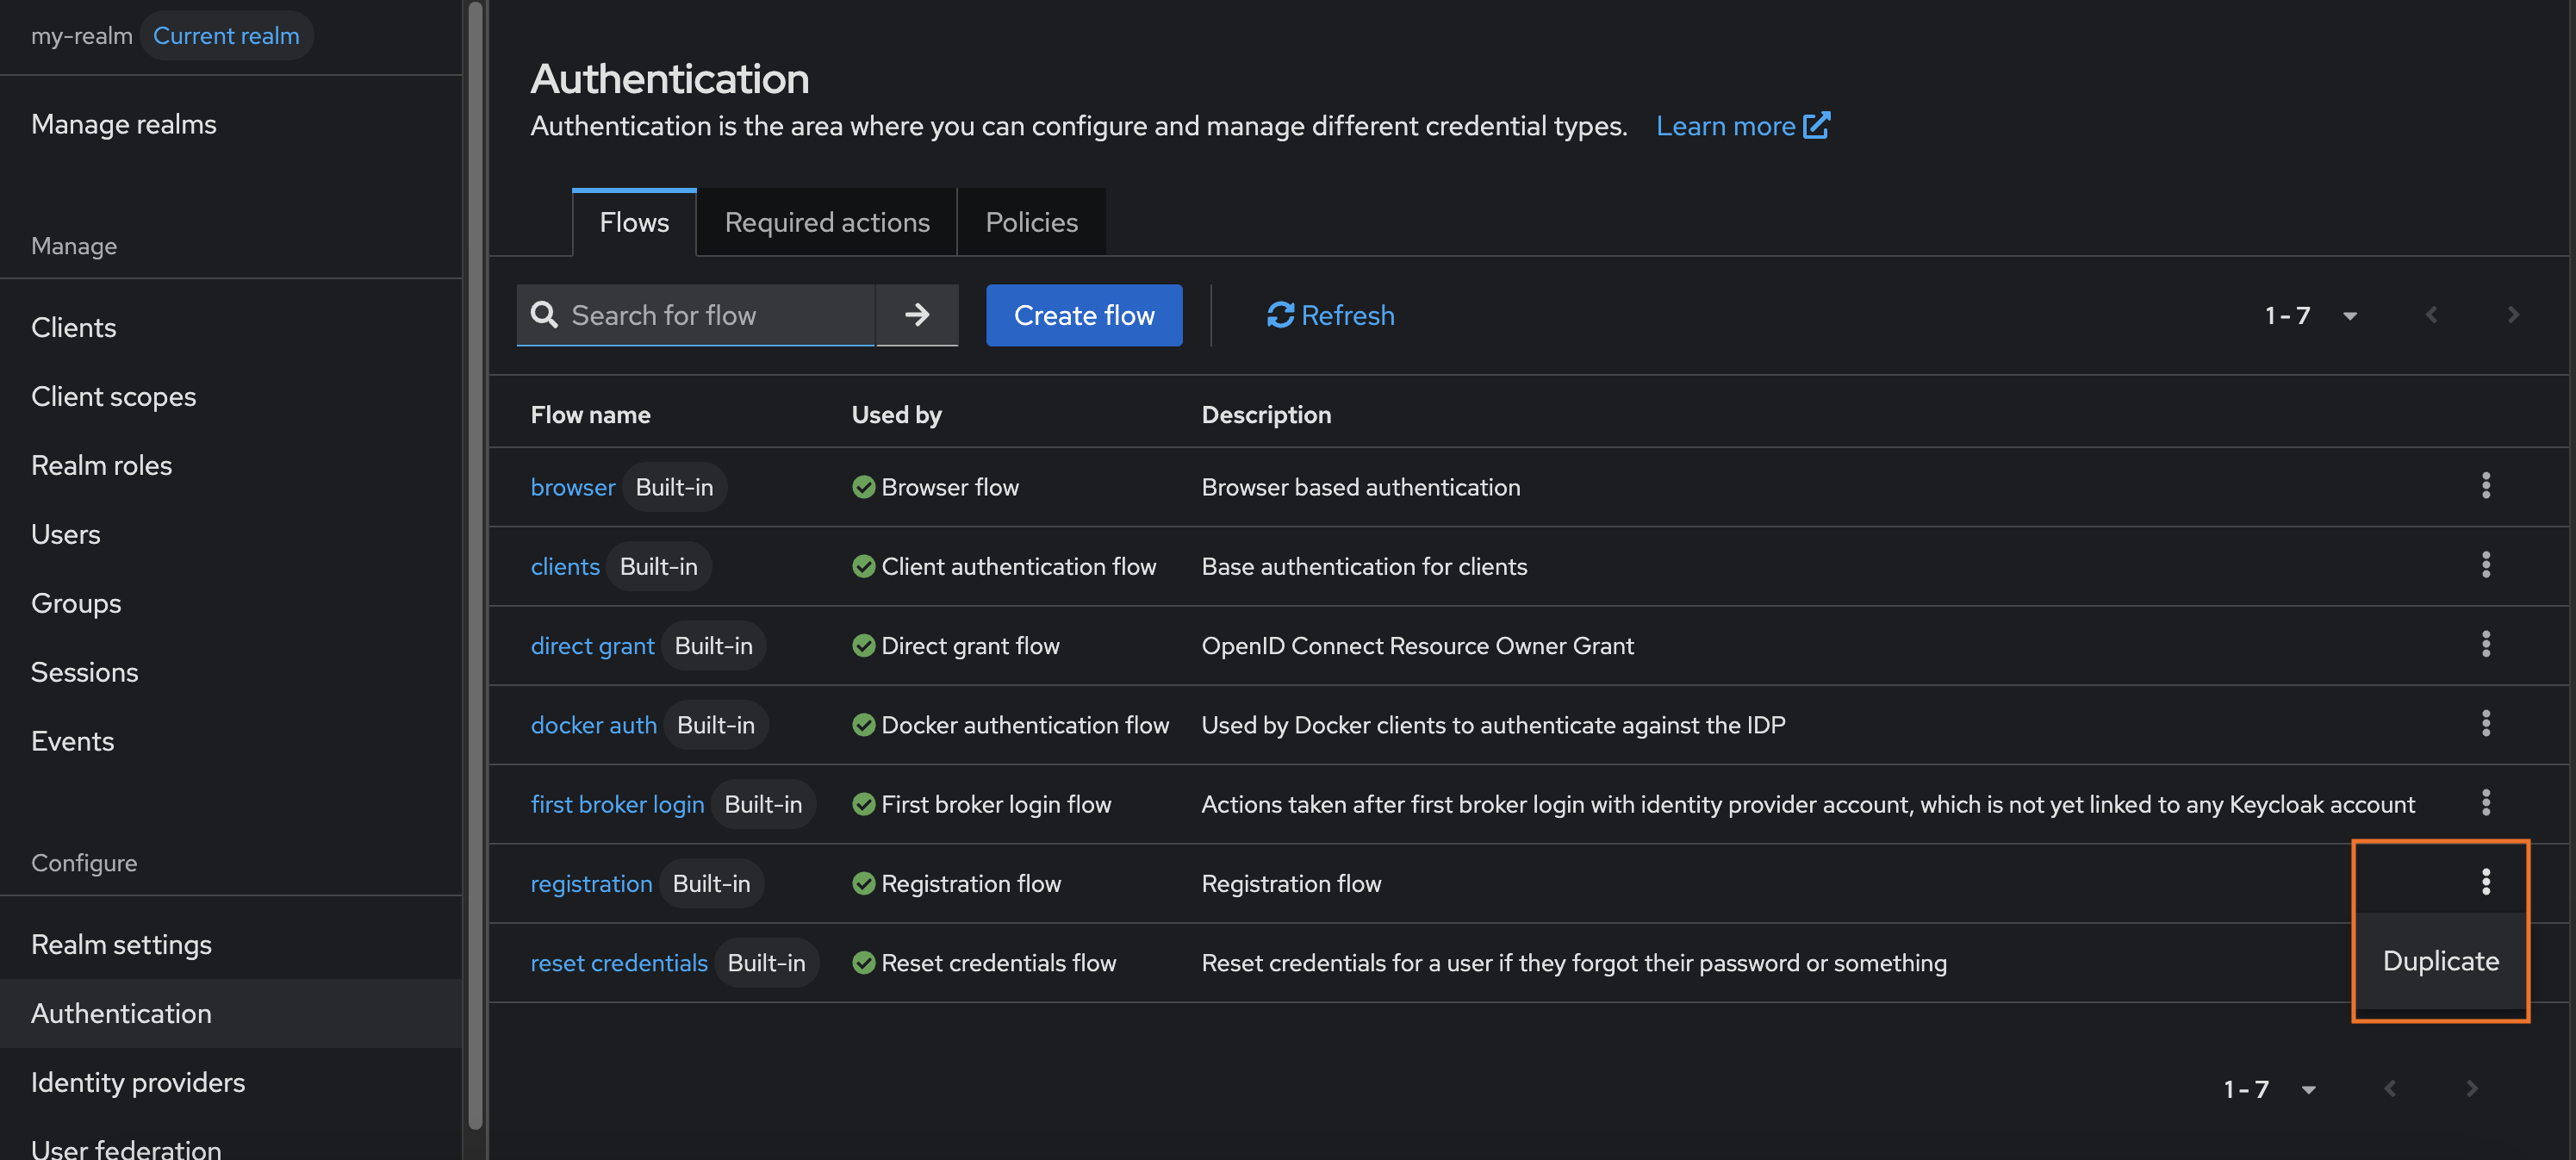
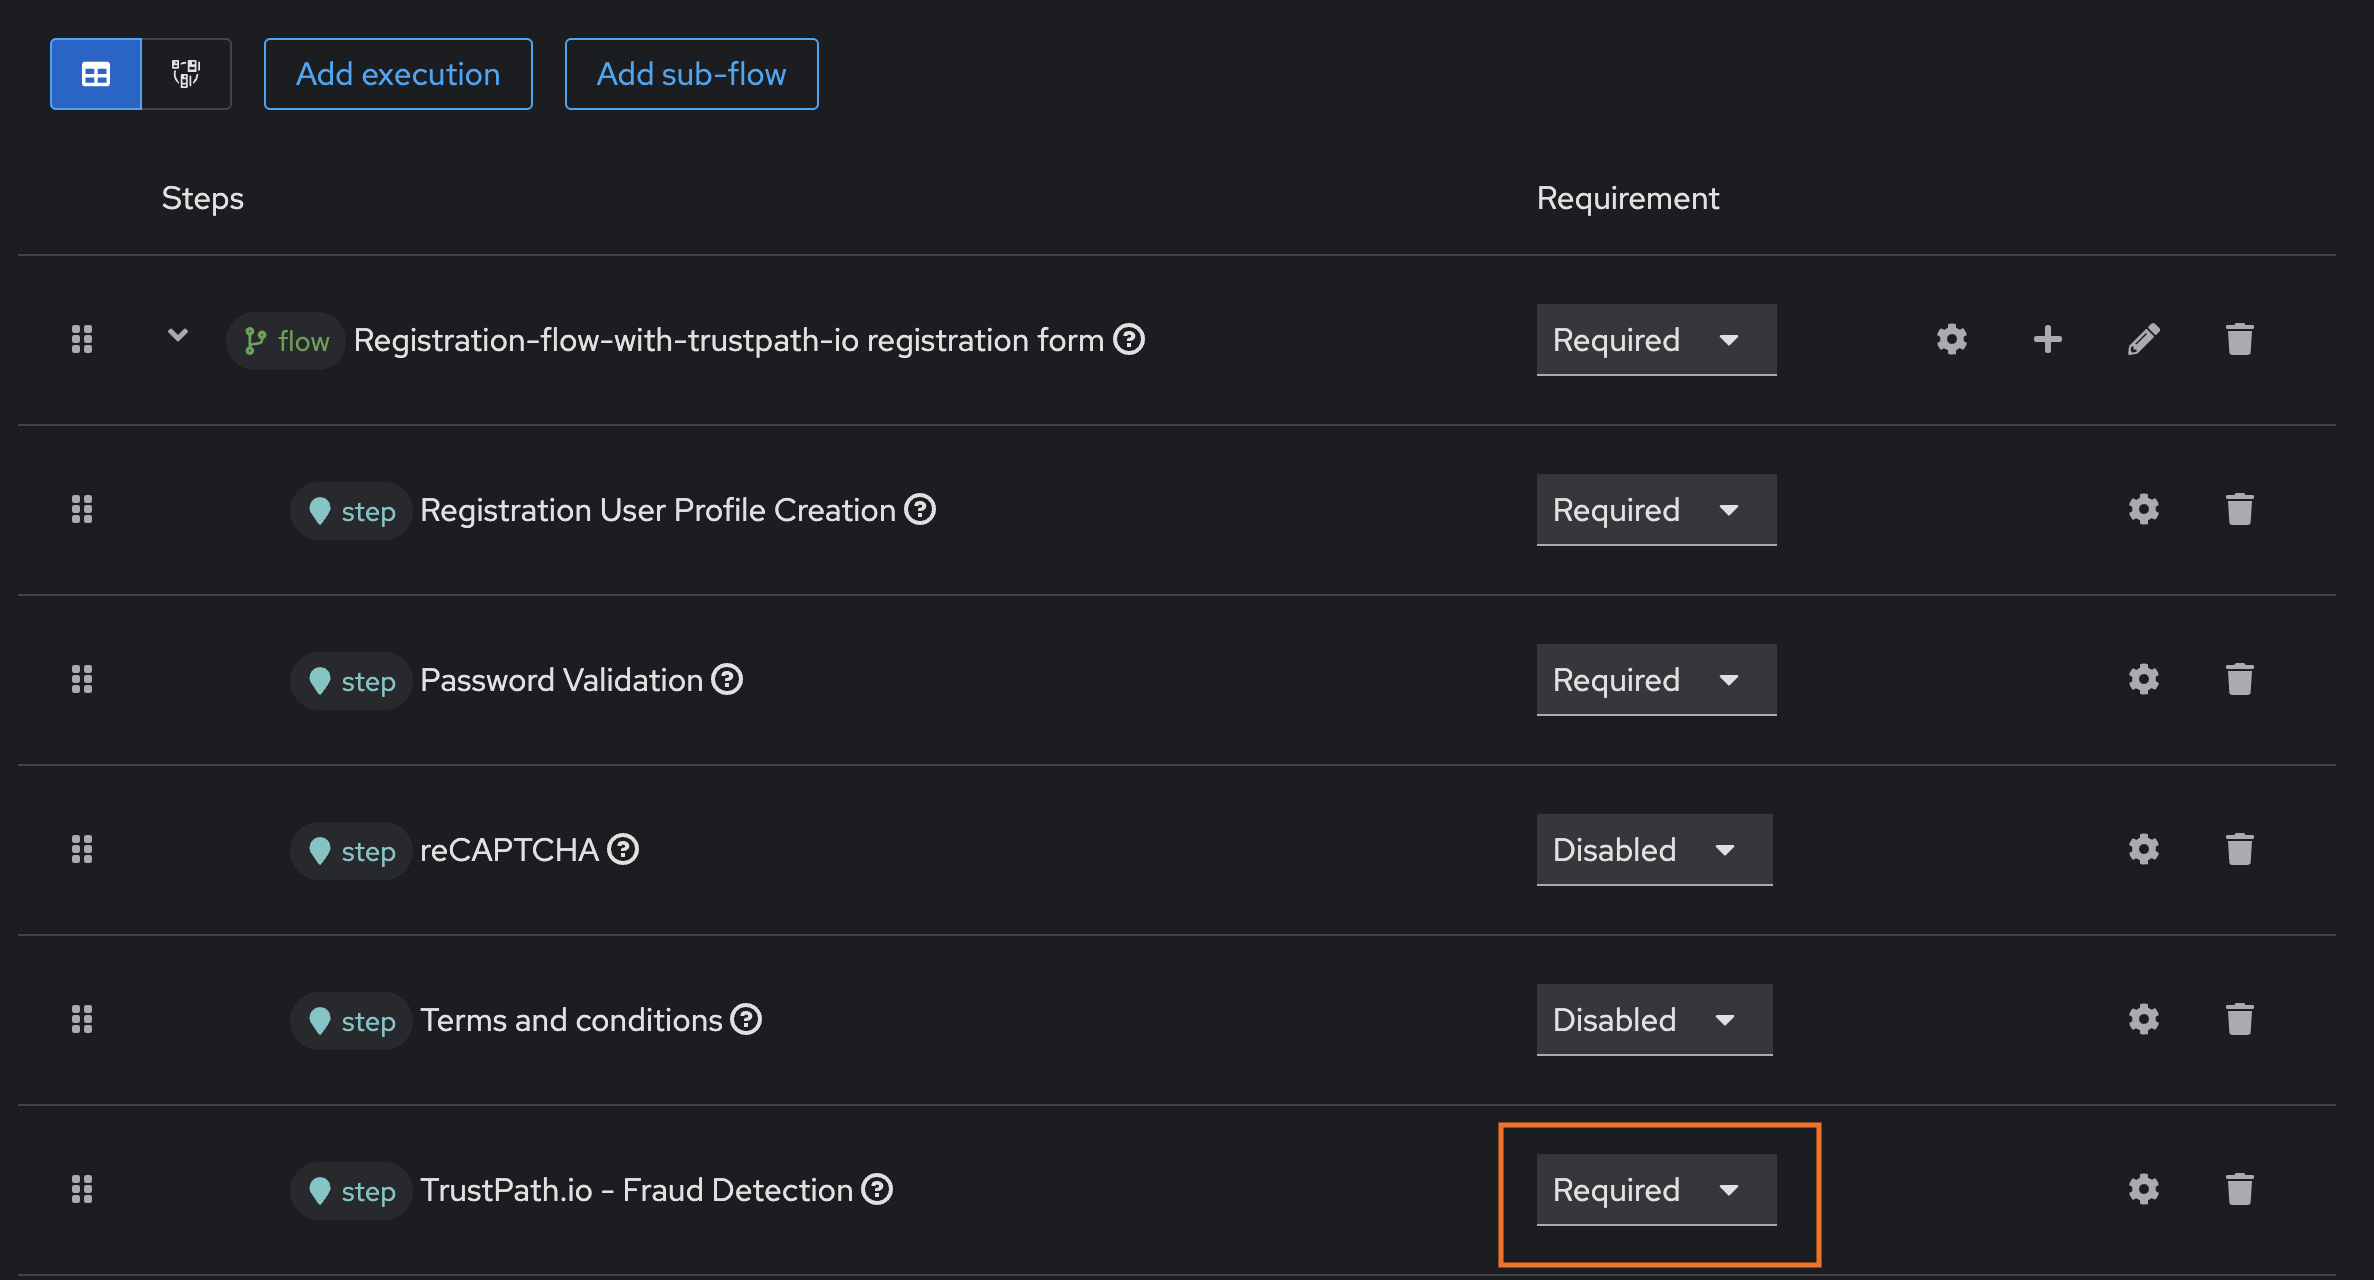
1 – Go to Configure > Authentication, and duplicate the "Registration" flow. Name the new flow Registration-flow-with-trustpath-io.

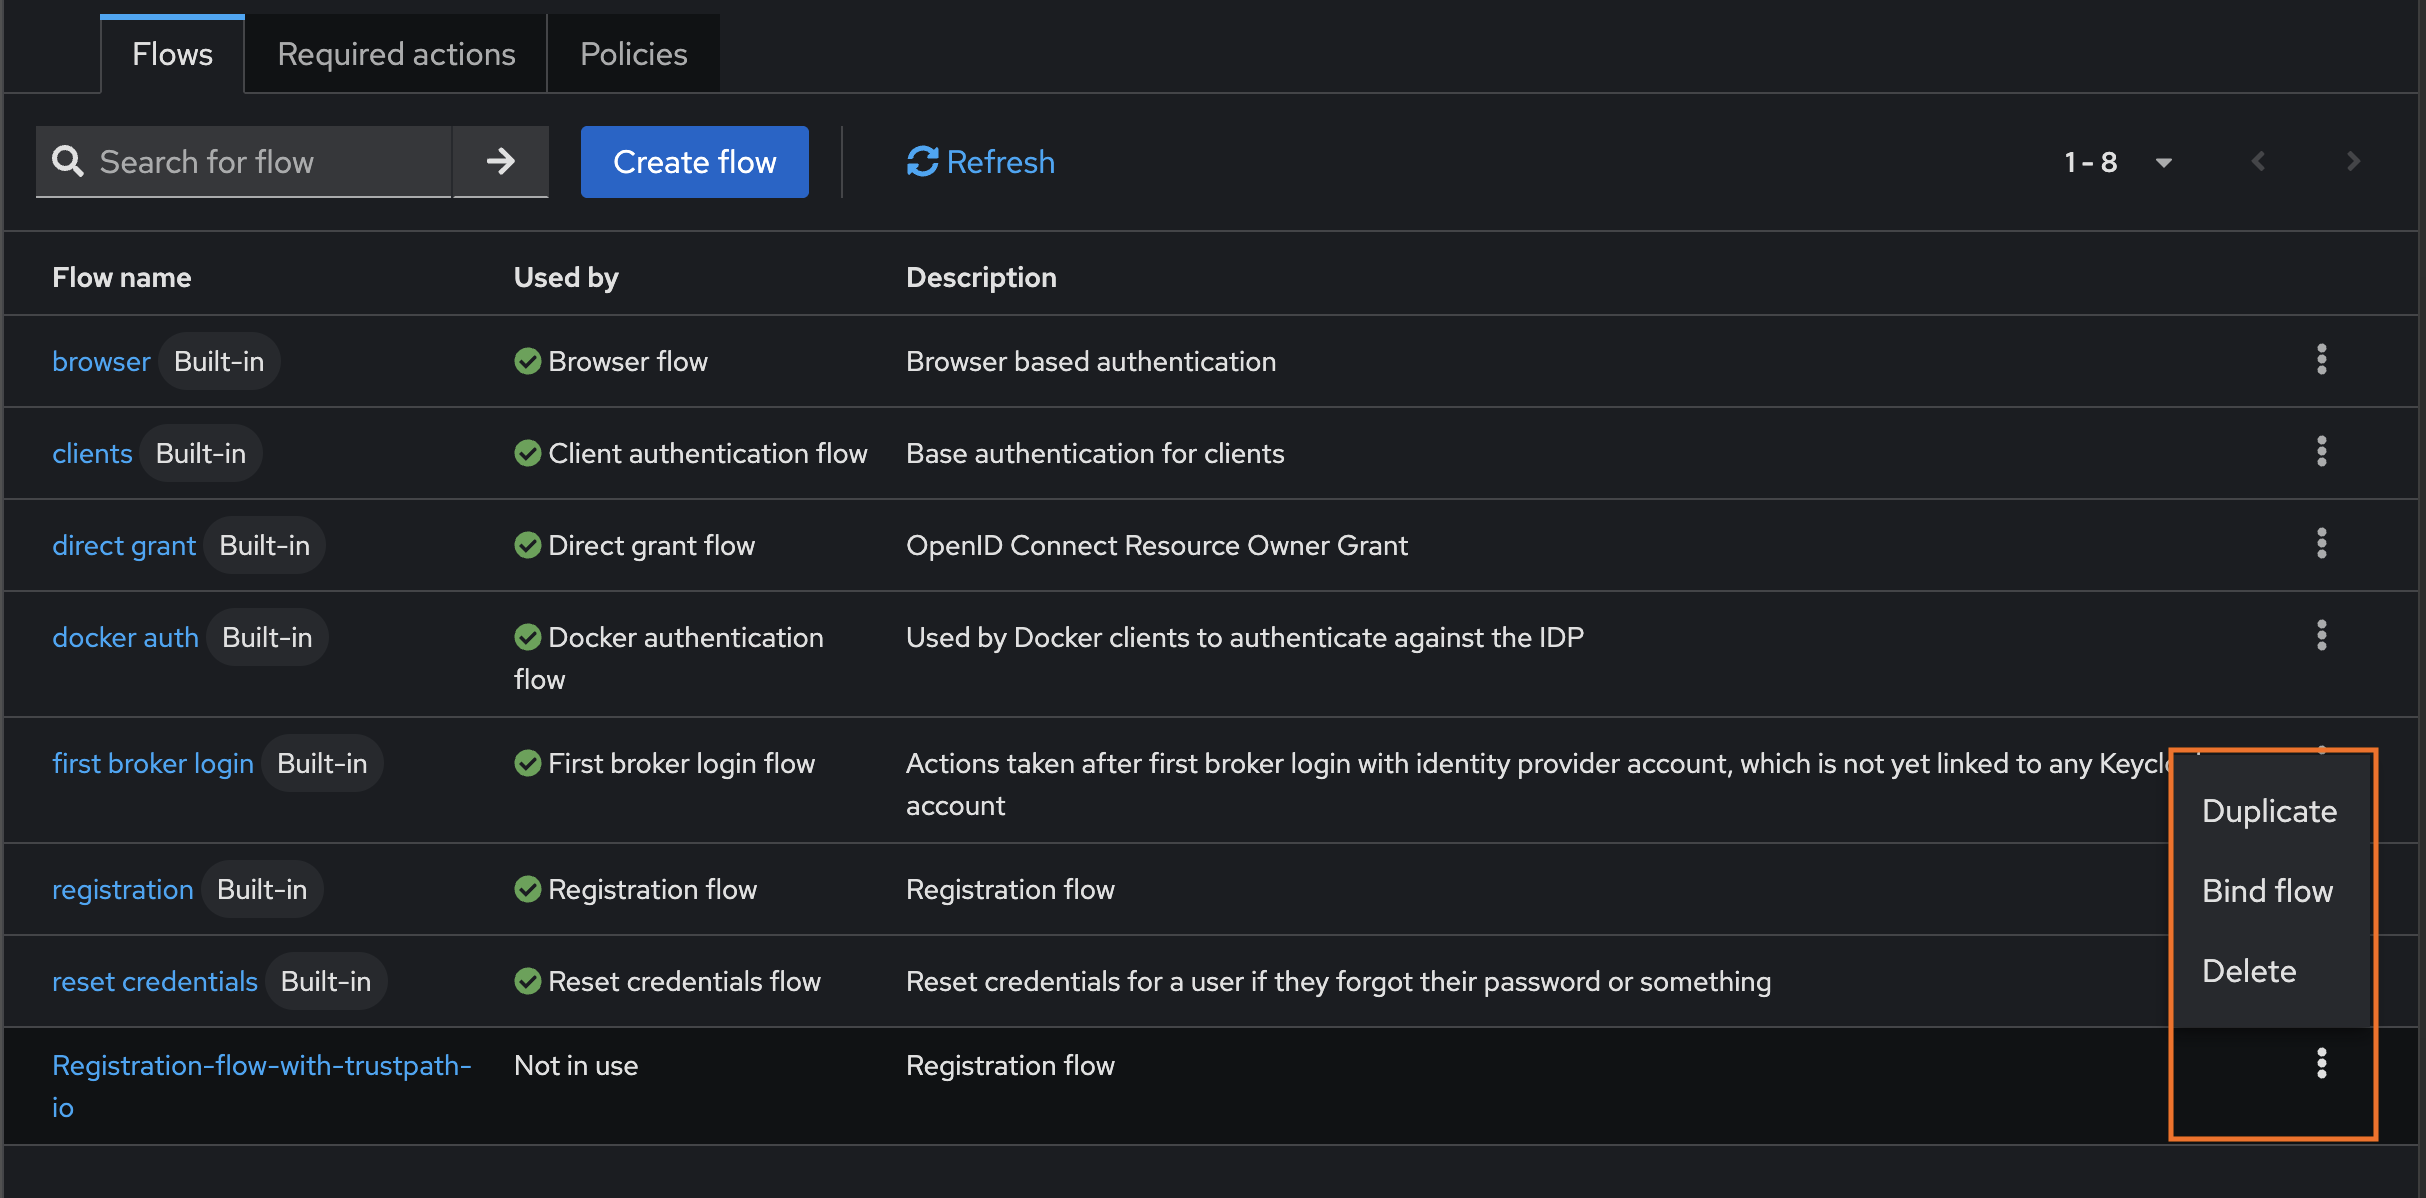
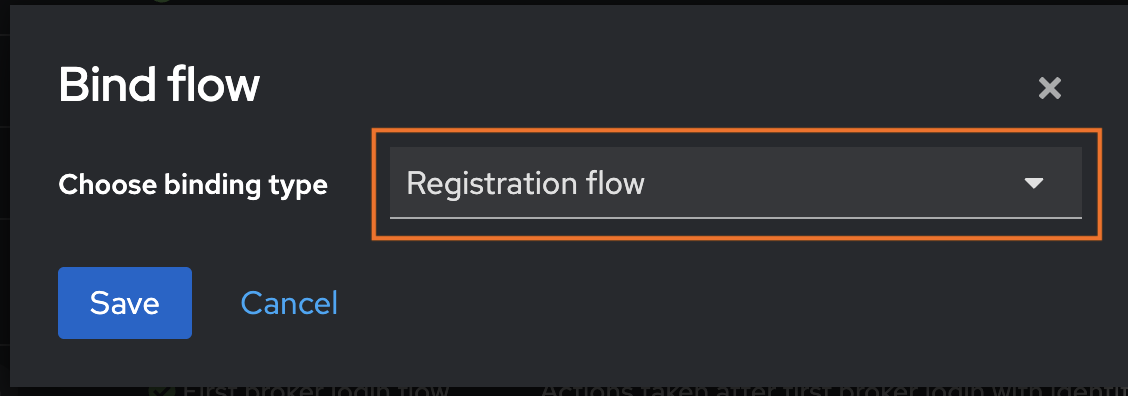
2 – Click the three-dot menu next to Registration-flow-with-trustpath-io, then select Bind Flow. In the dialog, choose Registration Flow as the Binding Type and bind your new flow.
3 – Open the Registration-flow-with-trustpath-io flow and click the + icon to add a new execution step.
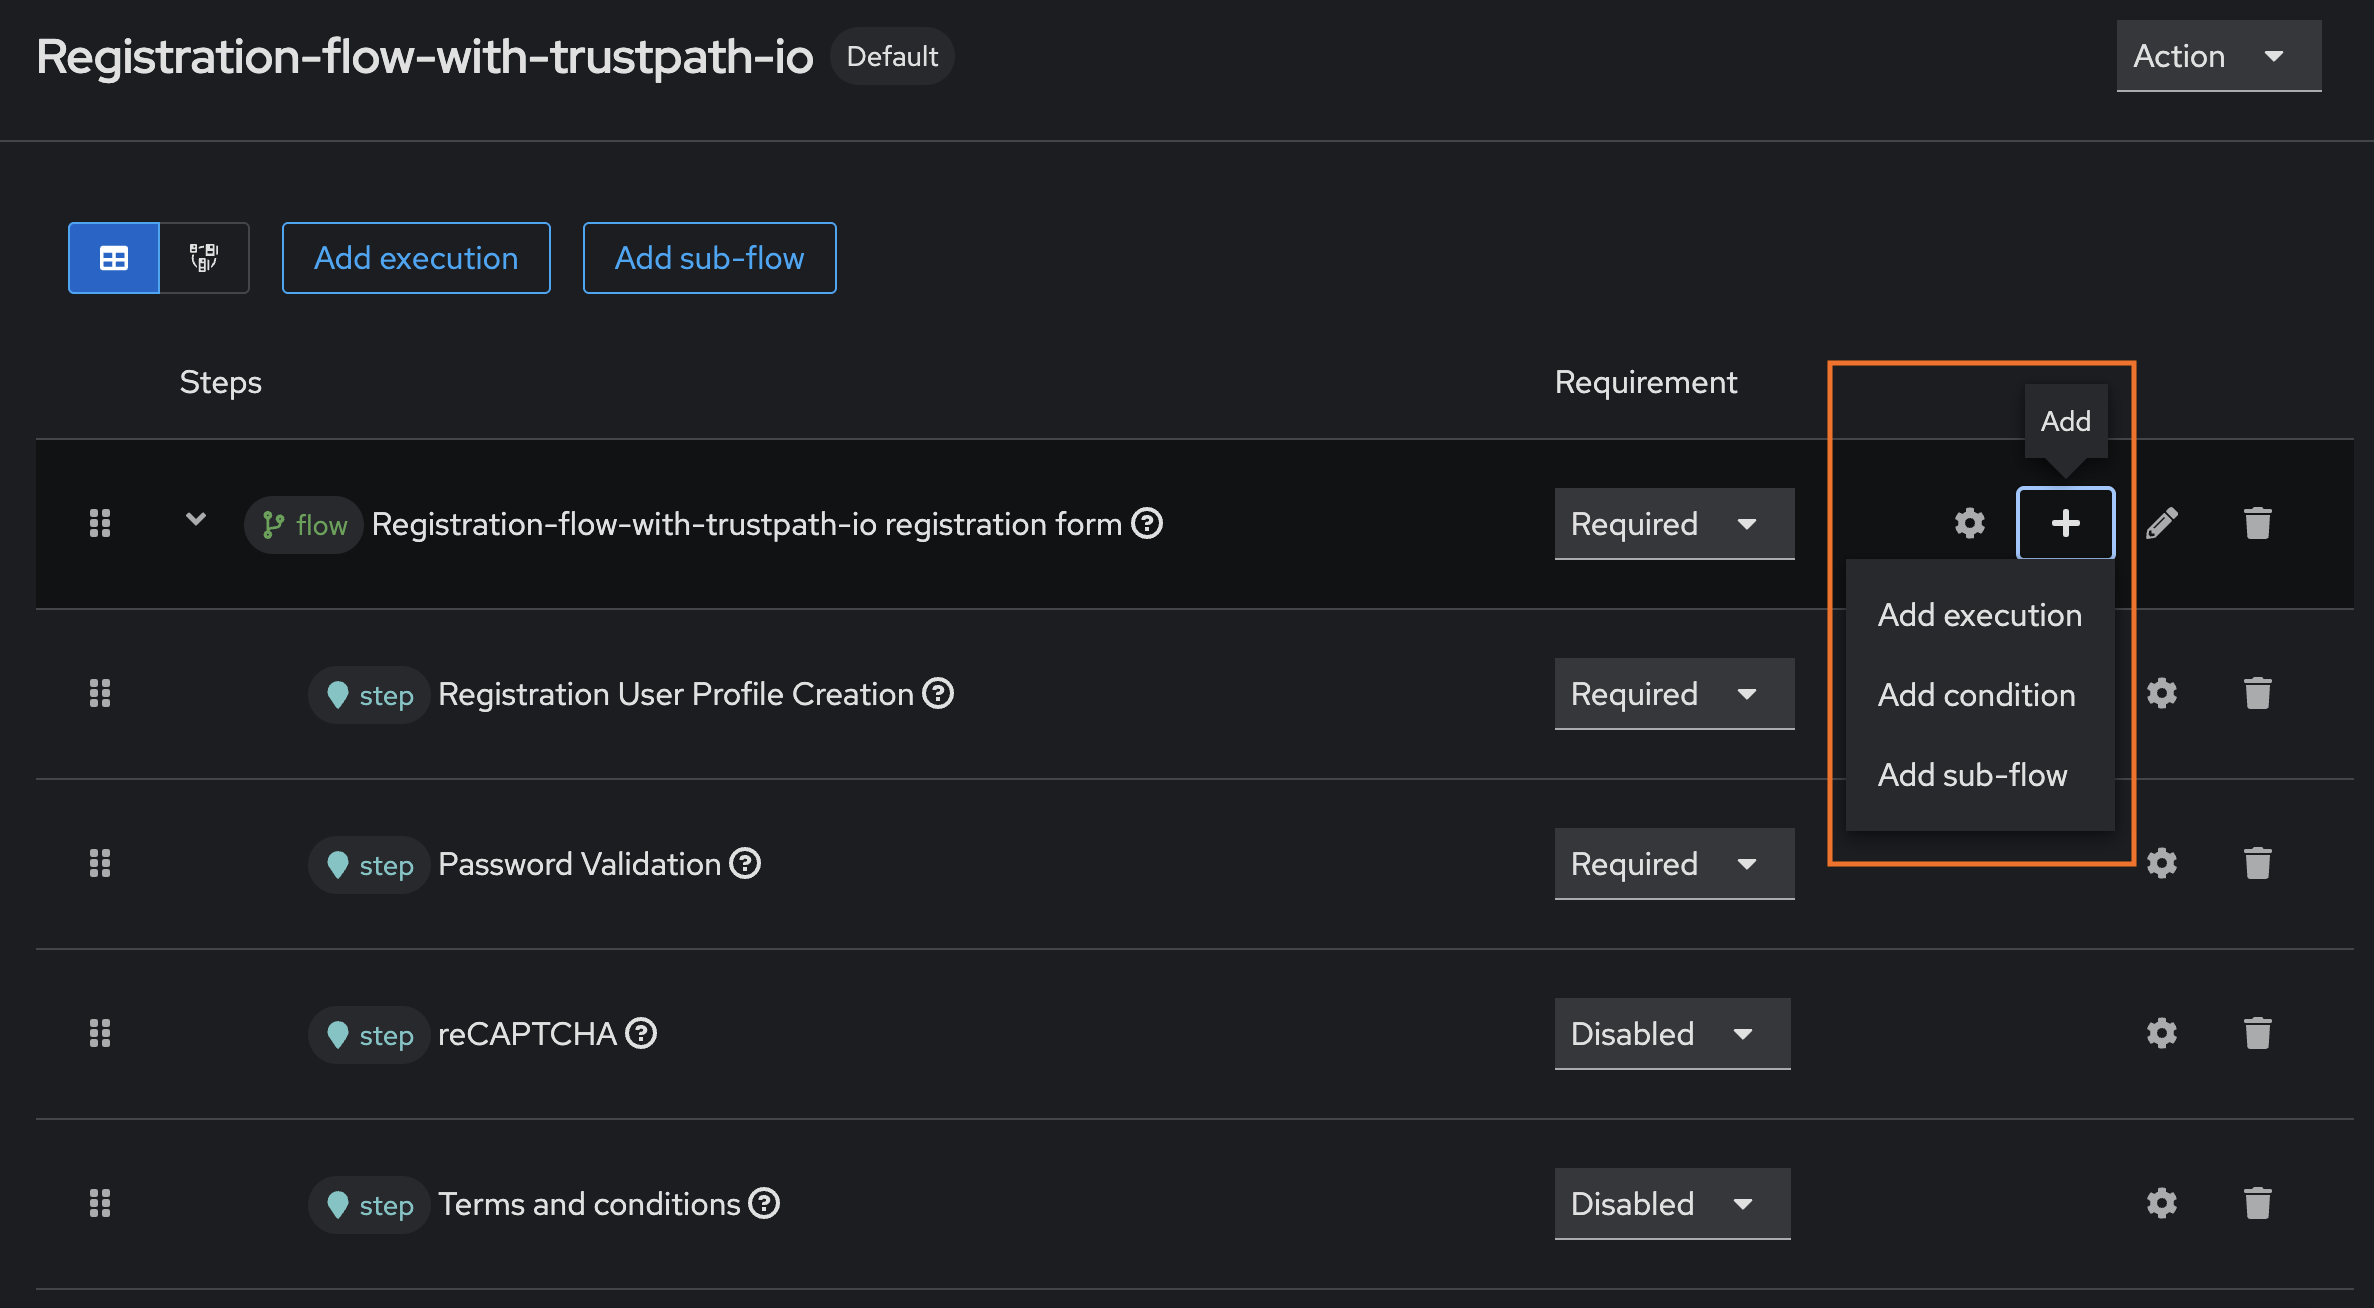
4 – From the list of available executions, select the SPI you built. If you cloned the example project, it should appear as TrustPath.io – Fraud Detection.
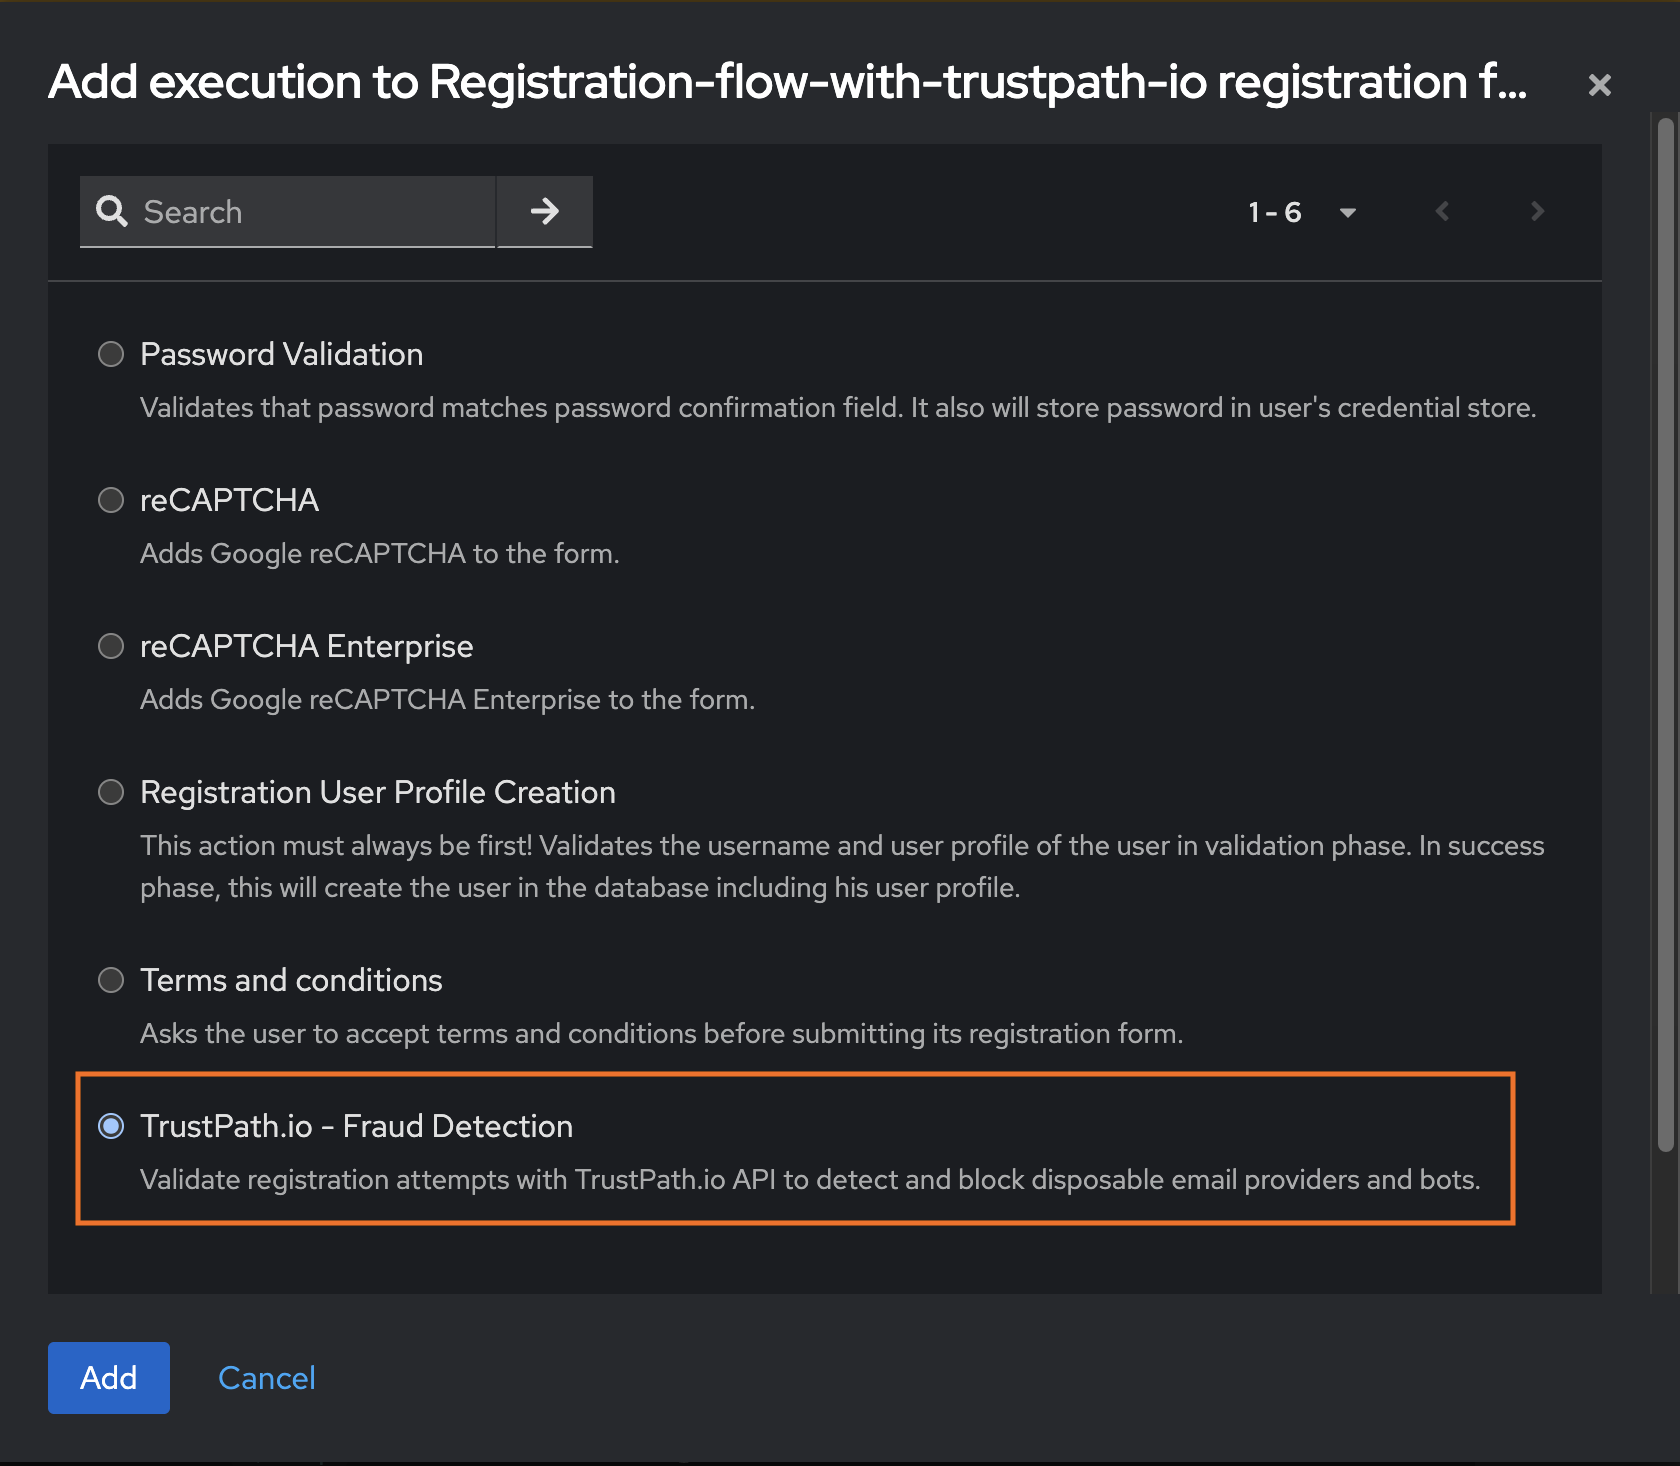
5 – You'll now see TrustPath.io – Fraud Detection added to the execution flow. On the right-hand side, set it to Required to activate it.
TrustPath.io Threat Detection Rules
TrustPath.io threat detection rules are individual risk assessment criteria designed to identify and flag potentially fraudulent activity. Each rule evaluates specific signals—such as behavior patterns or metadata—to detect suspicious events and assigns a corresponding risk score.
The total risk score for an event ranges from 0 to 100, where:
- 0 indicates no risk (safe to approve)
- 100 indicates high risk (likely fraudulent, recommended to decline)
Step-6 Configuring account_register
To set up detection for account registration flows:
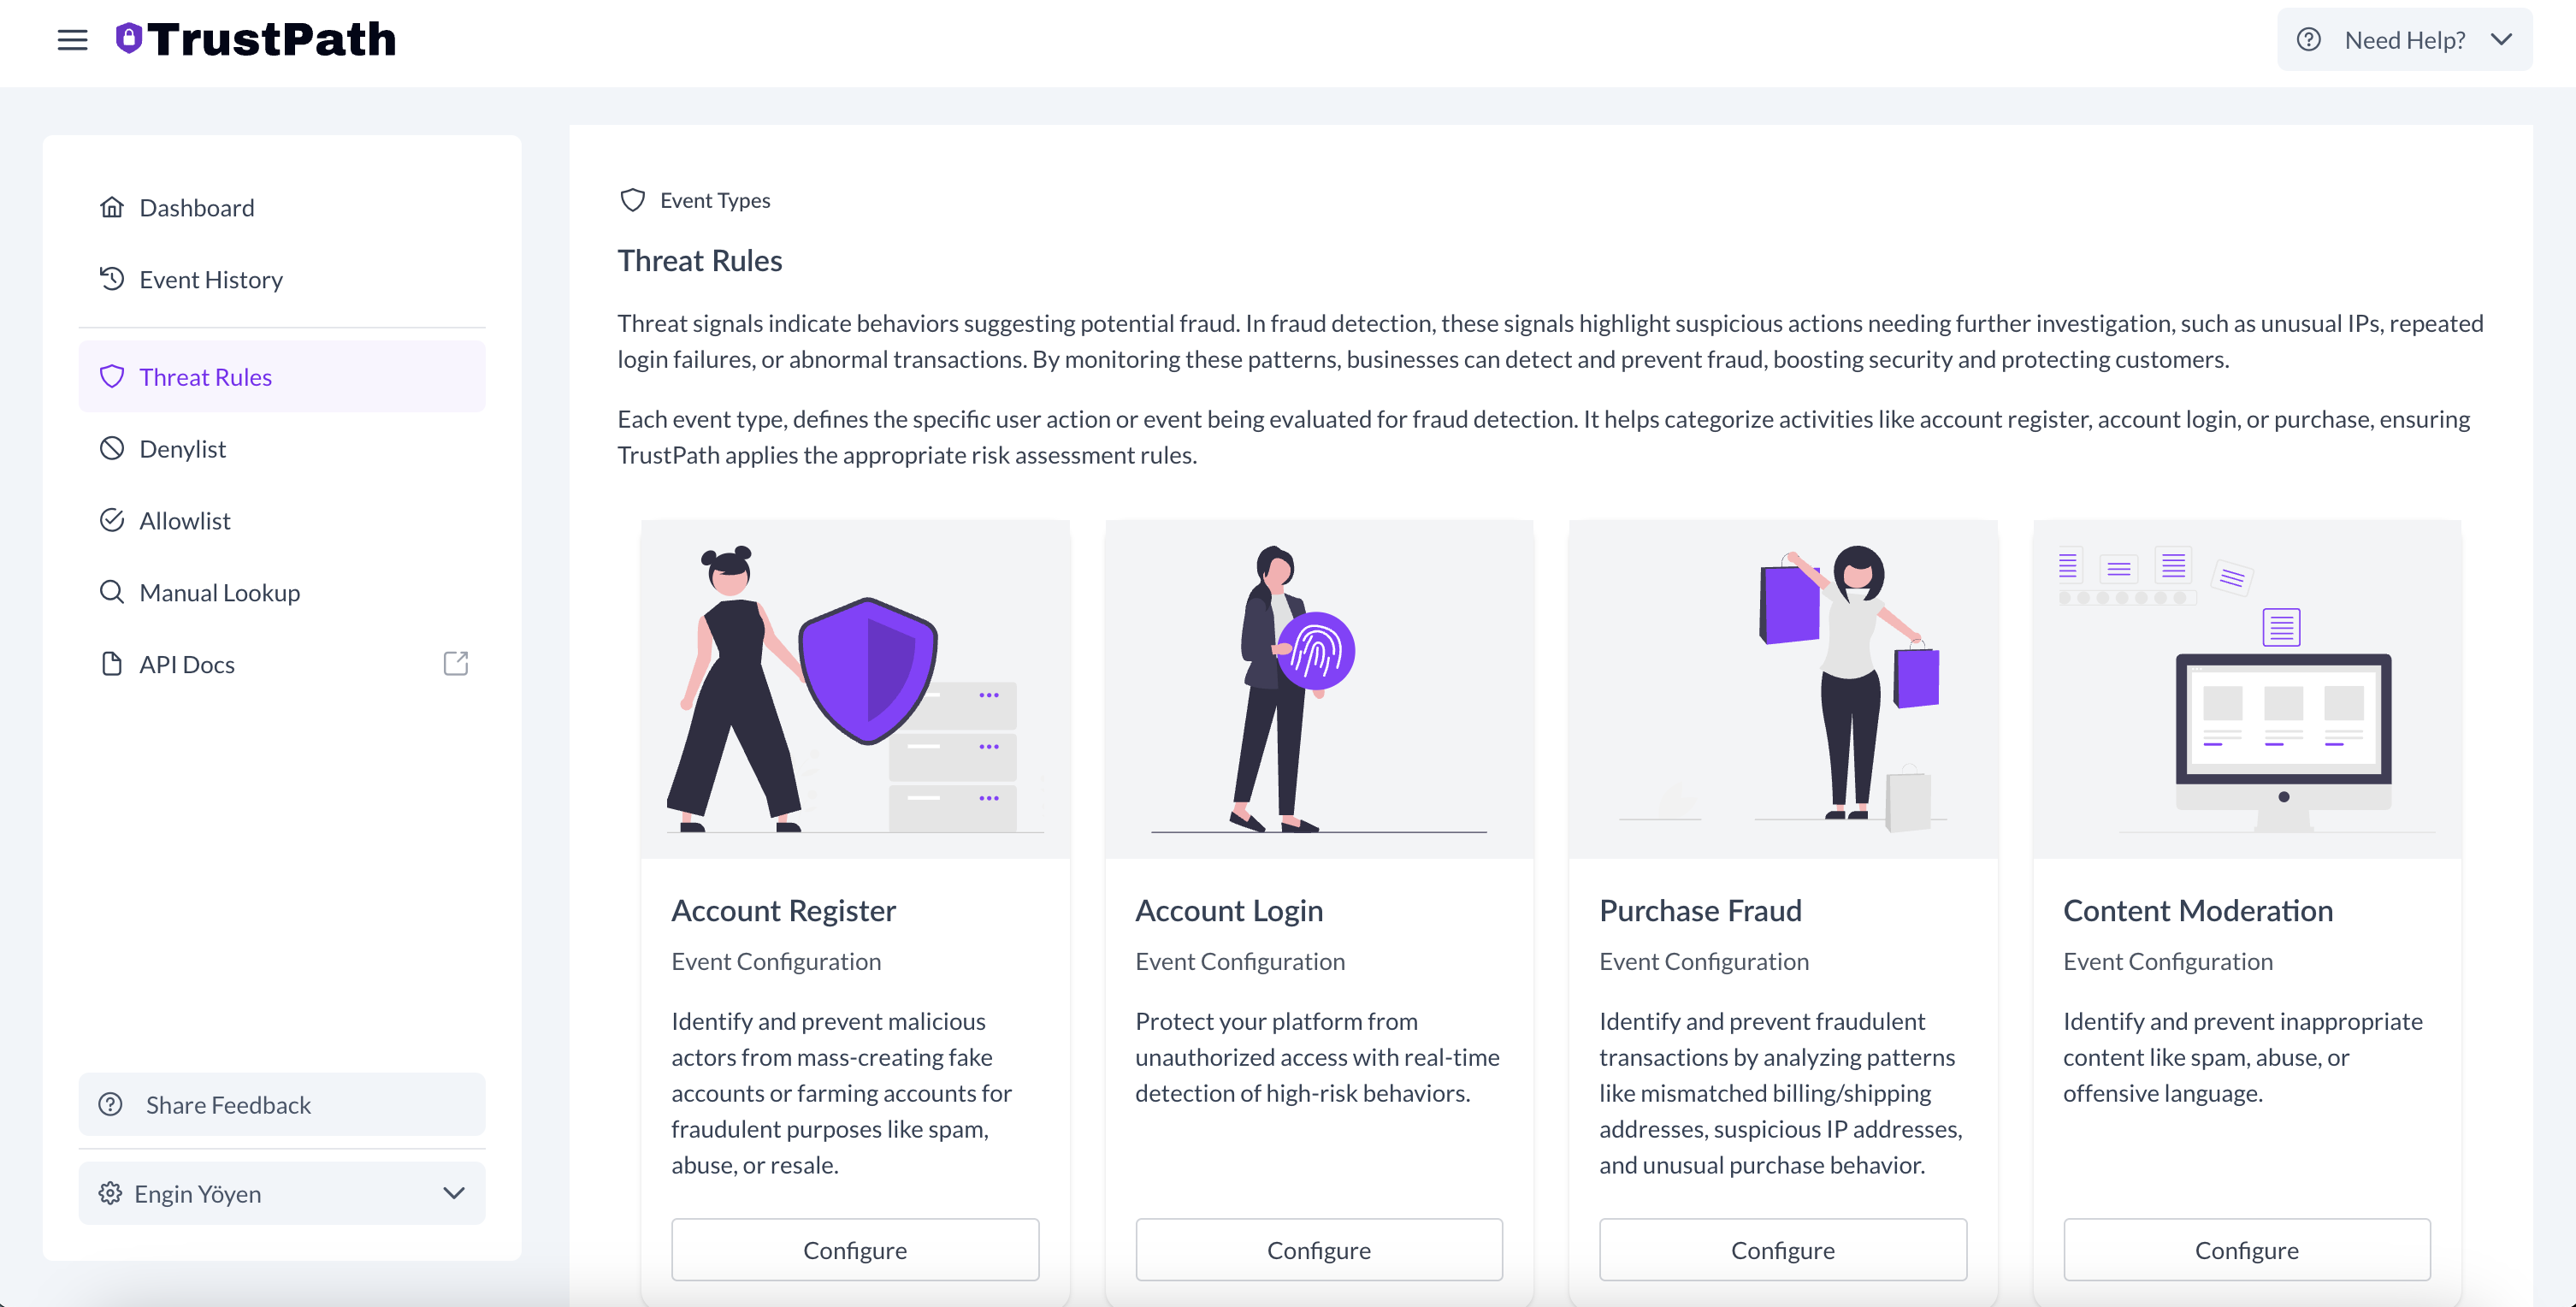
- Go to the ThreatRules section in the dashboard.
- Select the Account Register card.
- Use TrustPath.io's default rules or define custom rules to fit your needs.
This lets you tailor your risk scoring and automate responses based on event threat levels.
Adding Rules to the account_register Event
To improve fraud detection:
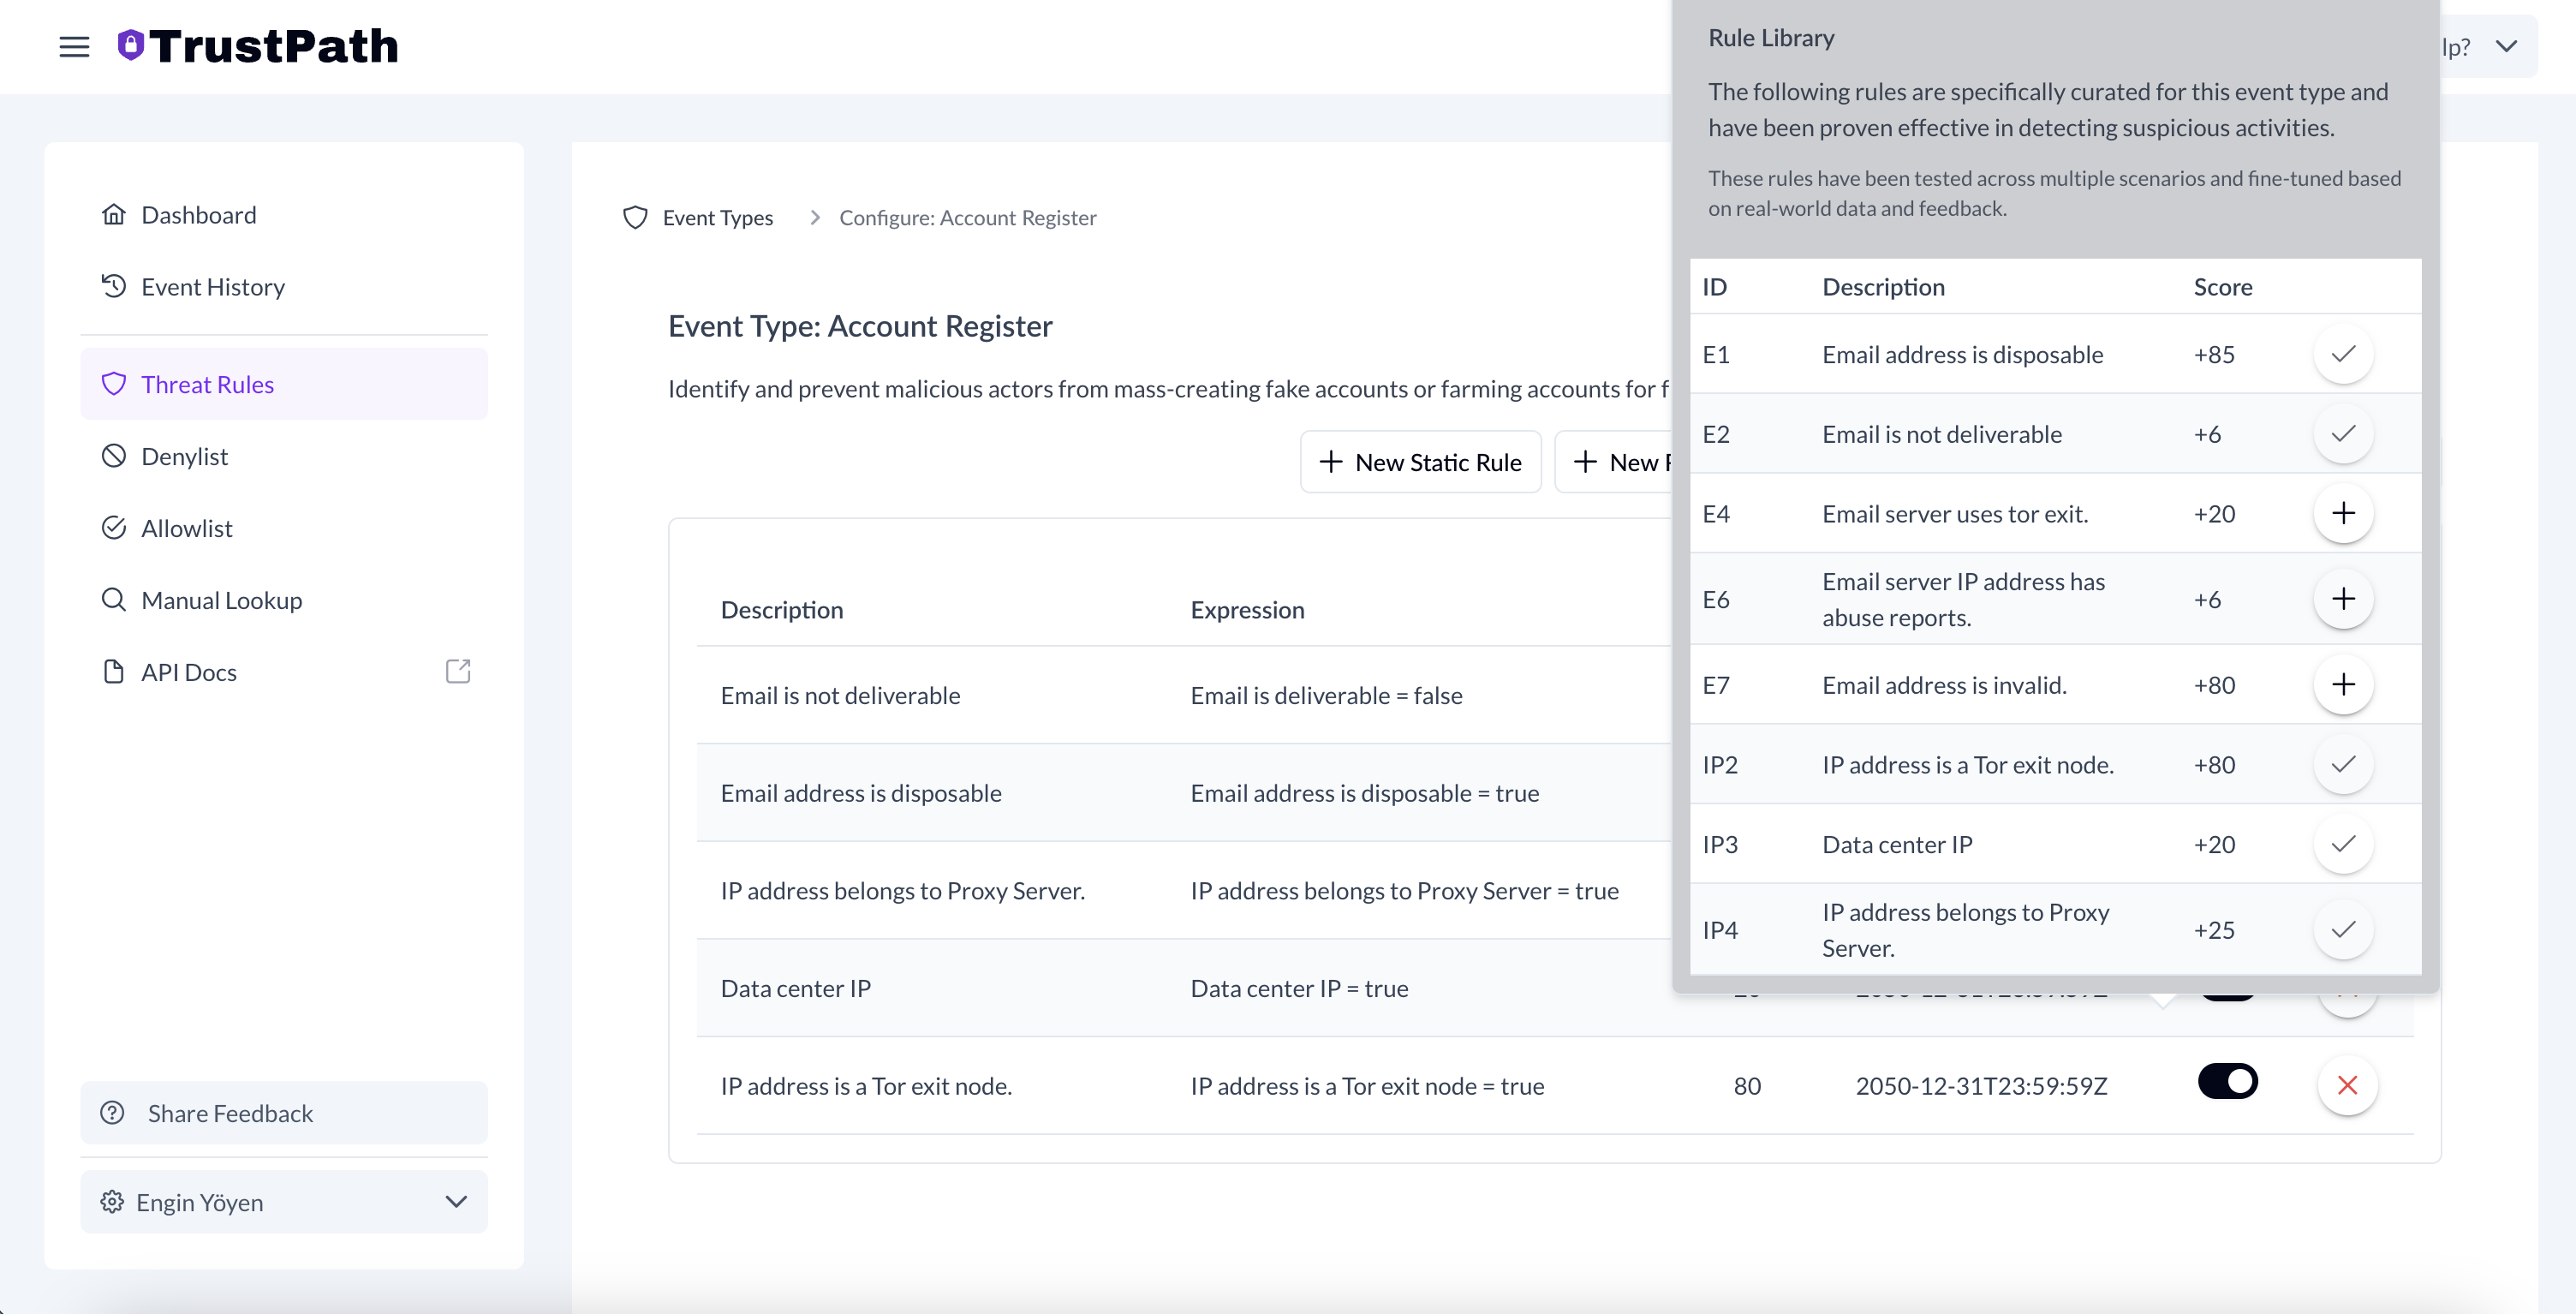
-
In ThreatRules, open the AccountRegister event.
-
Click Add Rule From Library (top-right).
-
Select relevant rules from the available list.
- Email is not deliverable
- Email address is disposable
- IP address belongs to a Proxy Server
- Data center IP
- IP address is a Tor exit node
Once added, these rules will automatically trigger email and IP-based threat signal checks for every new account registration on your platform, improving your ability to catch spam and malicious signups in real time.
In this step, we're not just verifying whether the email address is disposable—we're also assessing the user's IP address for signs of suspicious activity. These additional checks significantly strengthen your platform's ability to detect and prevent fraudulent signups.
For instance, if a user's IP address is associated with a data center, proxy server, or a known Tor exit node, it often indicates attempts to mask identity or automate signups—both of which are common tactics used by malicious actors and bots. By incorporating these IP-based signals alongside email validation, you can more accurately flag high-risk signups and take action before any damage is done.
Step 7: Testing the Integration
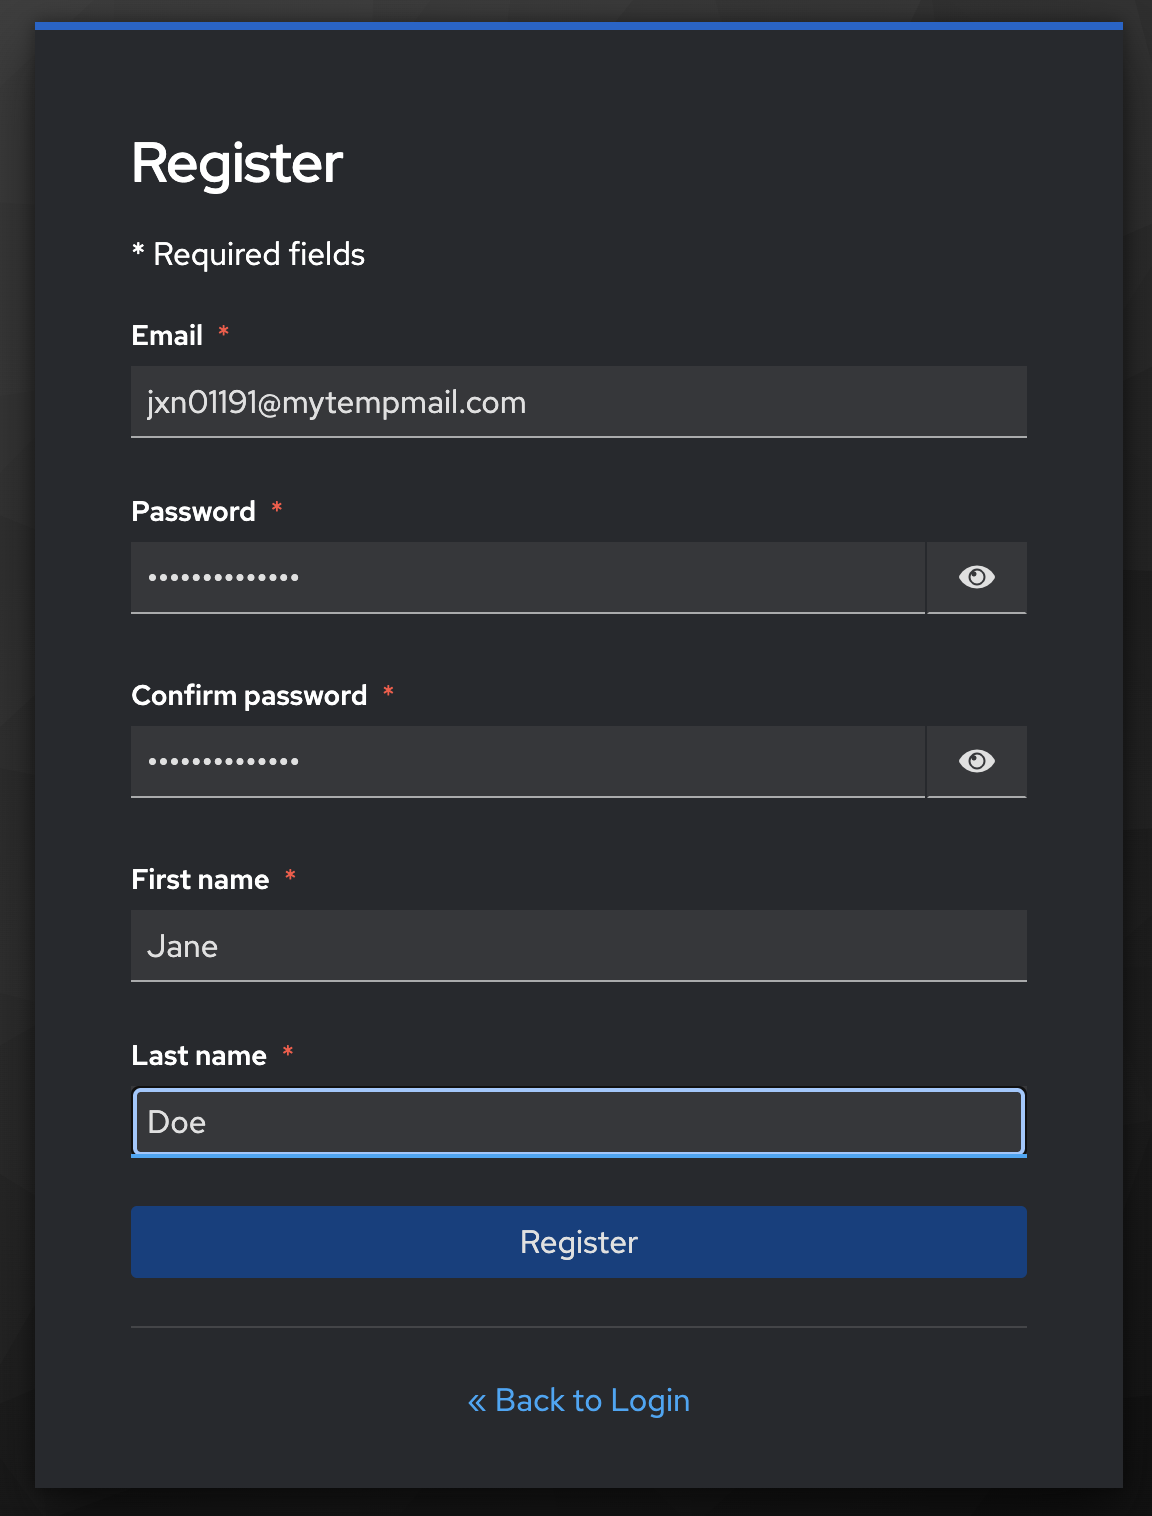
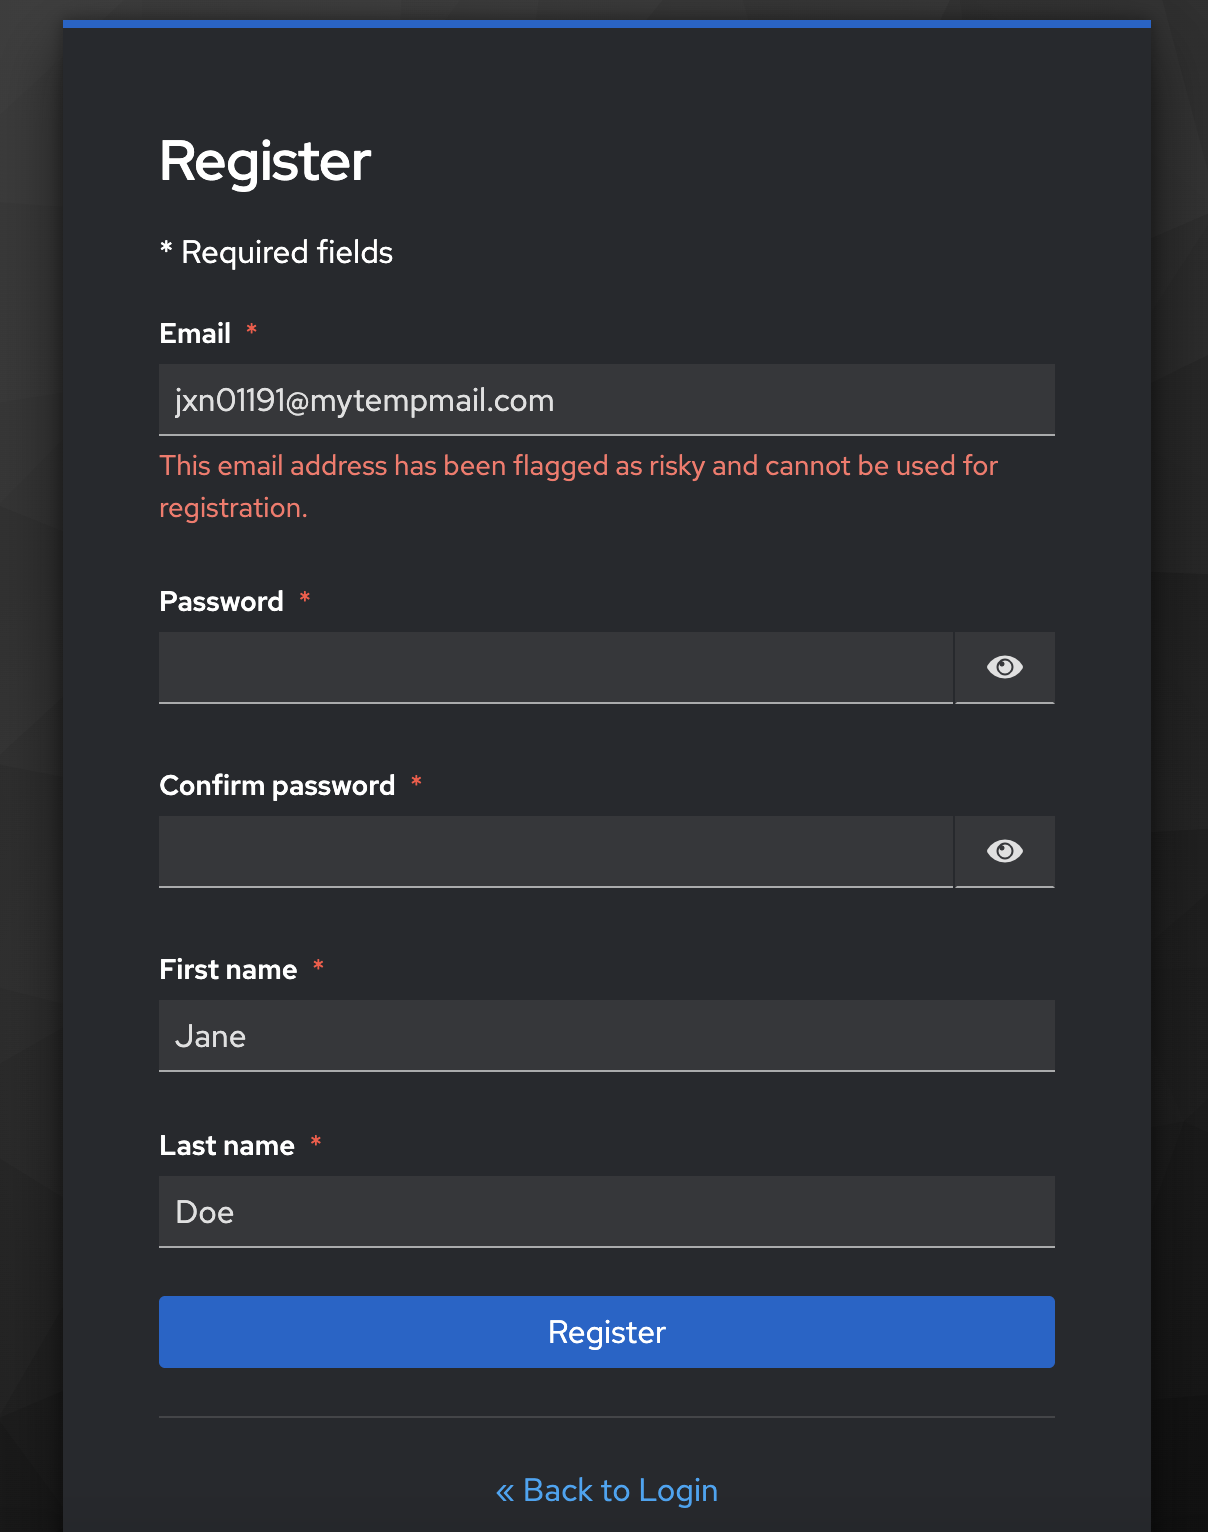
Now that everything is set up, it's time to test the entire flow. Open the account registration page in Keycloak and enter a disposable email address.
When the user clicks Register, Keycloak will make a request to TrustPath.io to perform a risk assessment. If the risk score is low, the risk state will be marked as APPROVE, and the user will be able to create an account. If the score is high, the risk state will be DECLINE, and the user will receive the message: "This email address has been flagged as risky and cannot be used for registration." No account will be created in your Keycloak instance.
This message can be customized to suit your needs, and it can be found in the EmailValidator.java class.
TrustPath.io Console
The request made by Keycloak can be viewed in detail in the TrustPath console. If you check the historical events, you will see that any declined request is logged in the console.
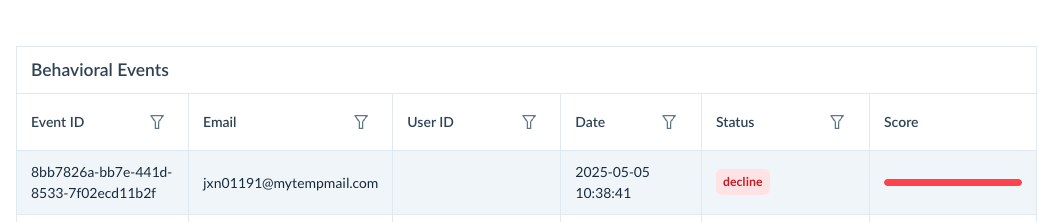
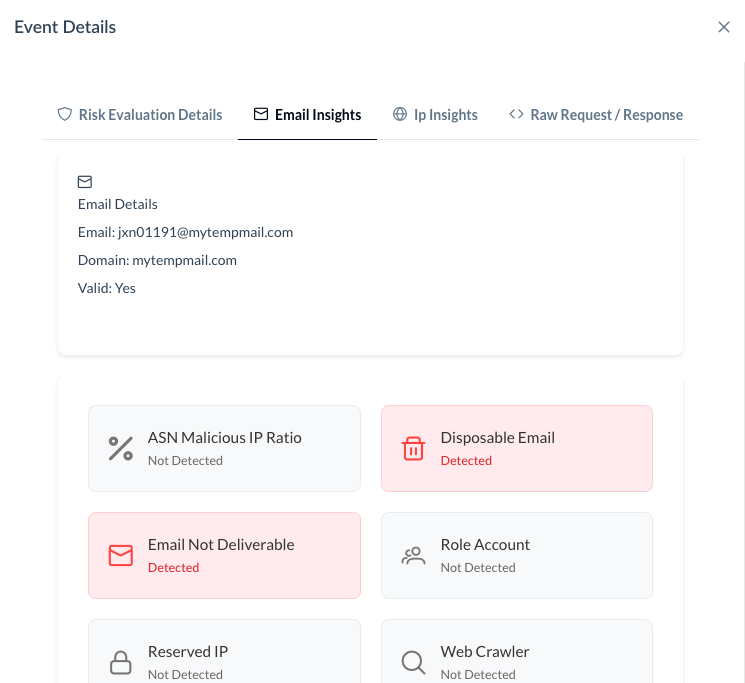
By selecting an individual request, you can view more detailed information about why it was declined, including whether the email is disposable or if other risk factors were identified in the incoming request.
Conclusion
The example above demonstrates how to tackle account registration fraud, such as attempts to create accounts with disposable emails or through anonymous networks like Tor. By integrating TrustPath.io with Keycloak, you can effectively prevent these types of fraudulent registrations.
Additionally, it is possible to address account takeover issues using TrustPath.io by following a similar pattern. The main difference would be using a different Keycloak SPI for the account takeover protection, allowing you to apply similar risk assessments and prevent unauthorized account access.
Support
If you need extra support, here's where to get it.
- TrustPath support: For questions related to fraud detection rules, API integration, or threat analysis, visit TrustPath, contact the TrustPath team, or view the TrustPath API docs.
- Keycloak support: For help with SPI development, authentication flows, or general setup, refer to the Keycloak docs or join the Keycloak community.